Developer Guide
Table of Contents
- Table of Contents
- Acknowledgements
- Setting up, getting started
- Design
- Implementation
- Documentation, logging, testing, configuration, dev-ops
- Appendix 1: Requirements
-
Appendix 2: Instructions for manual testing
- Launch and shutdown
- Adding an application
- Editing an application
- Completing an application
- Accepting/Rejecting an application
- Finding an application
- Listing all applications that are close to submission deadline or interview time
- Listing all applications
- Sorting the applications
- Deleting an application
- Clearing all applications
- Undoing/redoing a change
- Exiting the app
- Viewing help
- Saving data
- Appendix 3: Effort
- Appendix 4: Limitations and Future improvements
Acknowledgements
- While this product uses a generic application called AddressBook-Level3 (AB3)
as the starting point, the idea for some advanced features, such as
undoandredo, are adopted from AddressBook-Level4 (AB4).
Setting up, getting started
Refer to the guide Setting Up and Getting Started.
Design
.puml files used to create diagrams in this document can be found in the diagrams folder. Refer to the PlantUML Tutorial at se-edu/guides to learn how to create and edit diagrams.
Architecture
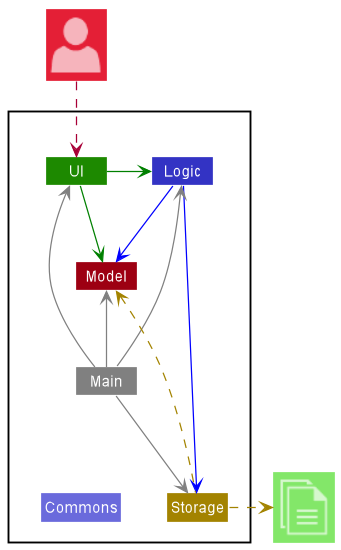
The Architecture Diagram given above explains the high-level design of the App.
Given below is a quick overview of main components and how they interact with each other.
Main components of the architecture
Main has two classes called Main and MainApp. It is responsible for,
- At app launch: Initializes the components in the correct sequence, and connects them up with each other.
- At shut down: Shuts down the components and invokes cleanup methods where necessary.
Commons represents a collection of classes used by multiple other components.
The rest of the App consists of four components.
-
UI: The UI of the App. -
Logic: The command executor. -
Model: Holds the data of the App in memory. -
Storage: Reads data from, and writes data to, the hard disk.
How the architecture components interact with each other
The Sequence Diagram below shows how the components interact with each other for the scenario where the user issues the command delete 1.
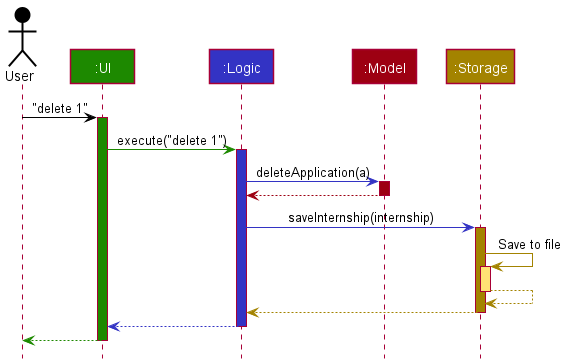
Each of the four main components (also shown in the diagram above),
- defines its API in an
interfacewith the same name as the Component. - implements its functionality using a concrete
{Component Name}Managerclass (which follows the corresponding APIinterfacementioned in the previous point.
For example, the Logic component defines its API in the Logic.java interface and implements its functionality using the LogicManager.java class which follows the Logic interface. Other components interact with a given component through its interface rather than the concrete class (reason: to prevent outside component’s being coupled to the implementation of a component), as illustrated in the (partial) class diagram below.

The sections below give more details of each component.
UI component
The API of this component is specified in Ui.java
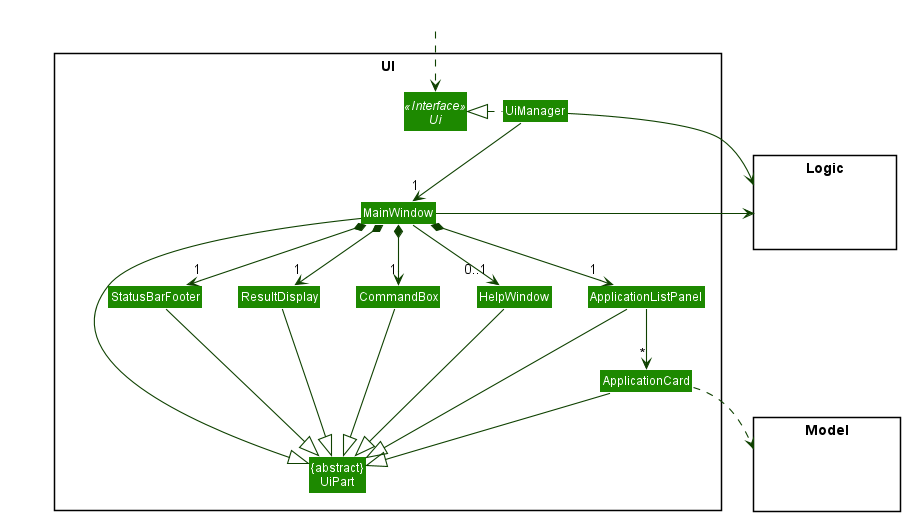
The UI consists of a MainWindow that is made up of parts e.g.CommandBox, ResultDisplay, ApplicationListPanel, StatusBarFooter etc. All these, including the MainWindow, inherit from the abstract UiPart class which captures the commonalities between classes that represent parts of the visible GUI.
The UI component uses the JavaFx UI framework. The layout of these UI parts are defined in matching .fxml files that are in the src/main/resources/view folder. For example, the layout of the MainWindow is specified in MainWindow.fxml
The UI component,
- executes user commands using the
Logiccomponent. - listens for changes to
Modeldata so that the UI can be updated with the modified data. - keeps a reference to the
Logiccomponent, because theUIrelies on theLogicto execute commands. - depends on some classes in the
Modelcomponent, as it displaysApplicationobject residing in theModel.
Logic component
API : Logic.java
Here’s a (partial) class diagram of the Logic component:
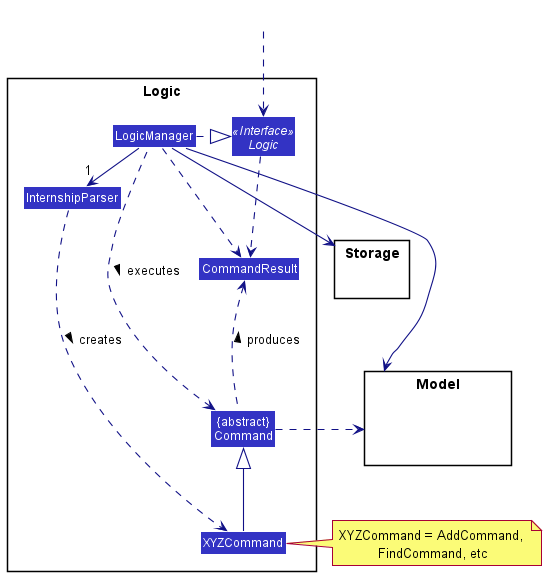
How the Logic component works:
- When
Logicis called upon to execute a command, it uses theInternshipParserclass to parse the user command. - This results in a
Commandobject (more precisely, an object of one of its subclasses e.g.,AddCommand) which is executed by theLogicManager. - The command can communicate with the
Modelwhen it is executed (e.g. to add an application). - The result of the command execution is encapsulated as a
CommandResultobject which is returned back fromLogic.
The Sequence Diagram below illustrates the interactions within the Logic component for the execute("delete 1") API call.
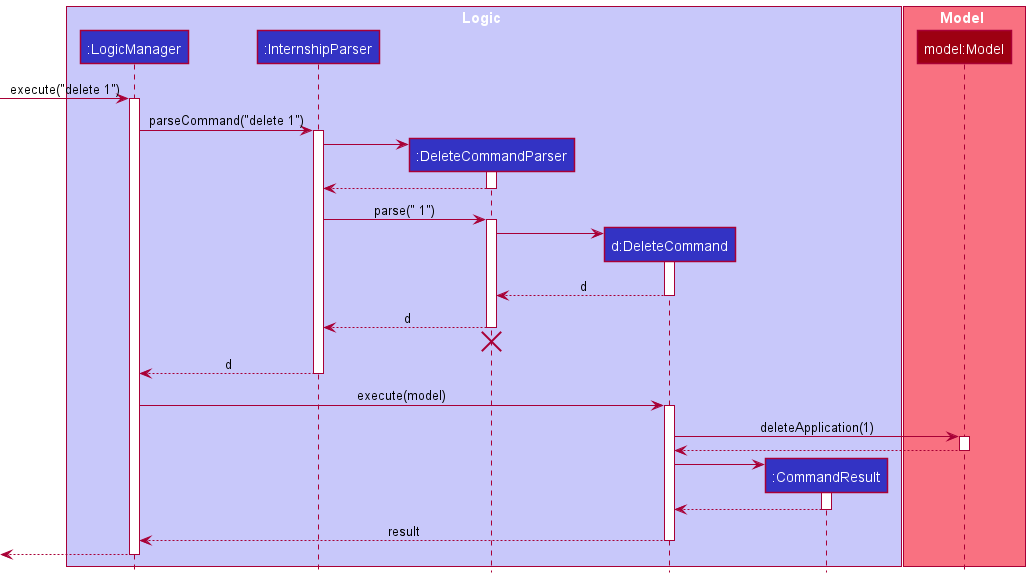
DeleteCommandParser should end at the destroy marker (X) but due to a limitation of PlantUML, the lifeline reaches the end of diagram.
Here are the other classes in Logic (omitted from the class diagram above) that are used for parsing a user command:
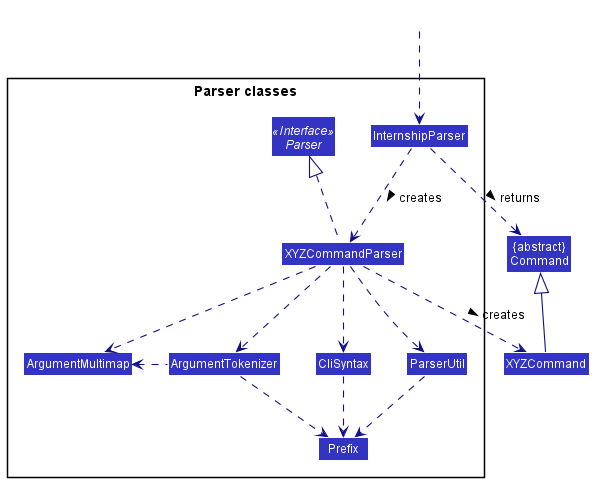
How the parsing works:
- When called upon to parse a user command, the
InternshipParserclass creates anXYZCommandParser(XYZis a placeholder for the specific command name e.g.,AddCommandParser) which uses the other classes shown above to parse the user command and create aXYZCommandobject (e.g.,AddCommand) which theInternshipParserreturns back as aCommandobject. - All
XYZCommandParserclasses (e.g.,AddCommandParser,DeleteCommandParser, …) inherit from theParserinterface so that they can be treated similarly where possible e.g, during testing.
Model component
API : Model.java

The Model component,
- stores the InternSHIP data i.e., all
Applicationobjects (which are contained in aUniqueApplicationListobject). - stores the currently ‘selected’
Applicationobjects (e.g., results of a search query) as a separate filtered list which is exposed to outsiders as an unmodifiableObservableList<Application>that can be ‘observed’ e.g. the UI can be bound to this list so that the UI automatically updates when the data in the list change. - stores a
UserPrefobject that represents the user’s preferences. This is exposed to the outside as aReadOnlyUserPrefobjects. - does not depend on any of the other three components (as the
Modelrepresents data entities of the domain, they should make sense on their own without depending on other components).
Requirement set and InterviewDateAndTime set in the Internship, which Application references. This allows Internship to only require one Requirement object per unique requirement, and one InterviewDateAndTime object per unique InterviewDateAndTime, instead of each Application needing their own Requirement and InterviewDateAndTime objects.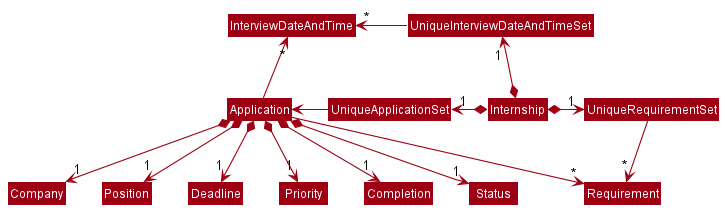
Storage component
API : Storage.java
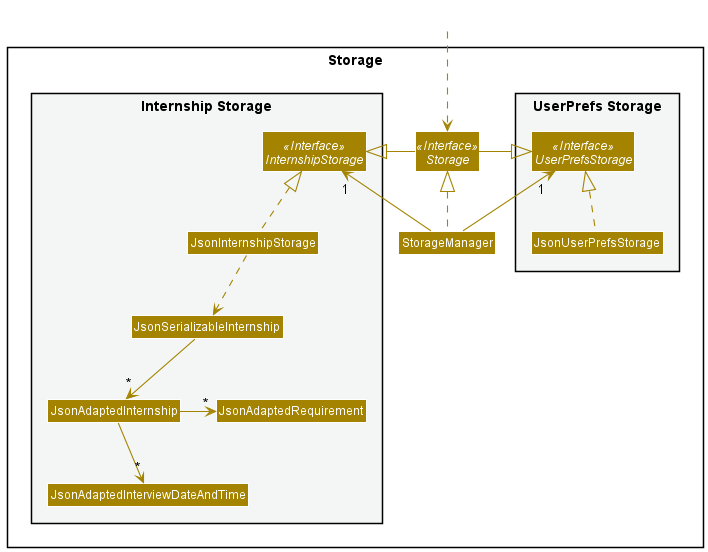
The Storage component,
- can save both InternSHIP data and user preference data in json format, and read them back into corresponding objects.
- inherits from both
InternshipStorageandUserPrefStorage, which means it can be treated as either one (if only the functionality of only one is needed). - depends on some classes in the
Modelcomponent (because theStoragecomponent’s job is to save/retrieve objects that belong to theModel).
Common classes
Classes used by multiple components are in the seedu.address.commons package.
Implementation
This section describes some noteworthy details on how certain features are implemented.
Complete feature
The complete command is modelled by the Completion class which represents the
‘Completion’ entity. The Completion field is also added as a private attribute to the
Application class. This field can take the following values:
CompletedUncompleted
Note: When a new internship application is added, the value of the
Completion field is ‘Uncompleted’ by default.
The Complete command is facilitated by the CompleteCommand class. It extends the Command class
and implements the CompleteCommand#execute method which wraps the main
logic of the command. This command can be used to change the completion status of
the application from Uncompleted to Completed.
The CompleteCommandParser class is responsible for parsing the index received from the user. This
class implements the Parser interface. The CompleteCommandParser#parse method of
this class parses the index and returns an CompleteCommand object with the index
as the parameter.
Below is a sequence diagram and an explanation of how the CompleteCommand is executed.
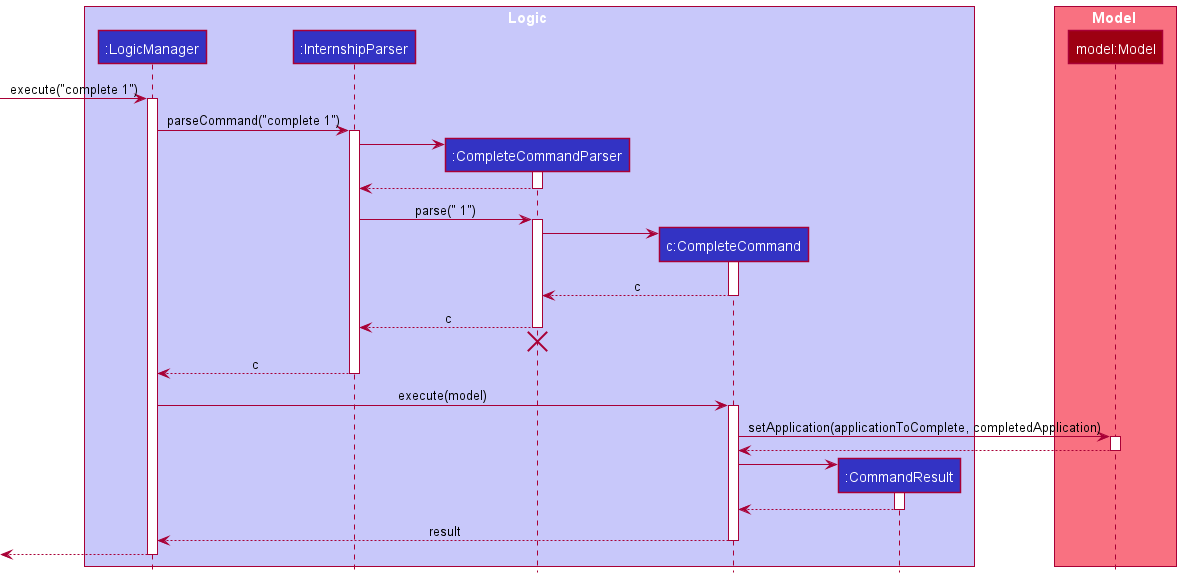
Step 1. The user enters complete 1 command in the main window.
Step 2. The command is handled by LogicManager#execute method, which then calls the InternshipParser#parseCommand method.
Step 3. InternshipParser matches the command word complete in the string and extracts the argument string 1.
Step 4. InternshipParser then calls CompleteCommandParser#parse method and the argument string is converted to an Index instance.
Step 5. CompleteCommandParser creates a new CompleteCommand instance and returns it to InternshipParser, which in turn returns it to LogicManager.
Step 6. LogicManager then calls the CompleteCommand#execute method.
Step 7. Next, CompleteCommand object calls the Model#setApplication method with the application to complete and completed application
as arguments. It then returns a CommandResult object to the LogicManager.
Step 8. Finally, the CommandResult object is returned by the LogicManager.
Design considerations:
-
Alternative 1 (current choice): Only allow users to complete an existing application in the list
- Pros: Easy to implement.
- Cons: User cannot add an application that has already been completed.
-
Alternative 2: Provide the option to specify the completion status of an application when it is first added to the list
- Pros: Everything can be done in one shot.
- Cons: The
addcommand will require too many parameters.
Accept feature
The accept command is modelled by the Status class which represents the
‘Status’ entity. The Status field is also added as a private attribute to the
Application class. This field can take the following values:
PendingAcceptedRejected
Note: When a new internship application is added, the value of the
Status field is ‘Pending’ by default.
The Accept command is facilitated by the AcceptCommand class. It extends the Command class
and implements the AcceptCommand#execute method which wraps the main
logic of the command. This command can be used to change the status of
the application from Pending to Accepted. When the status changes, the application completion
field would change from Uncompleted to Completed automatically.
The AcceptCommandParser class is responsible for parsing the index received from the user. This
class implements the Parser interface. The AcceptCommandParser#parse method of
this class parses the index and returns an AcceptCommand object with the index
as the parameter.
Below is a sequence diagram and an explanation of how the AcceptCommand is executed.
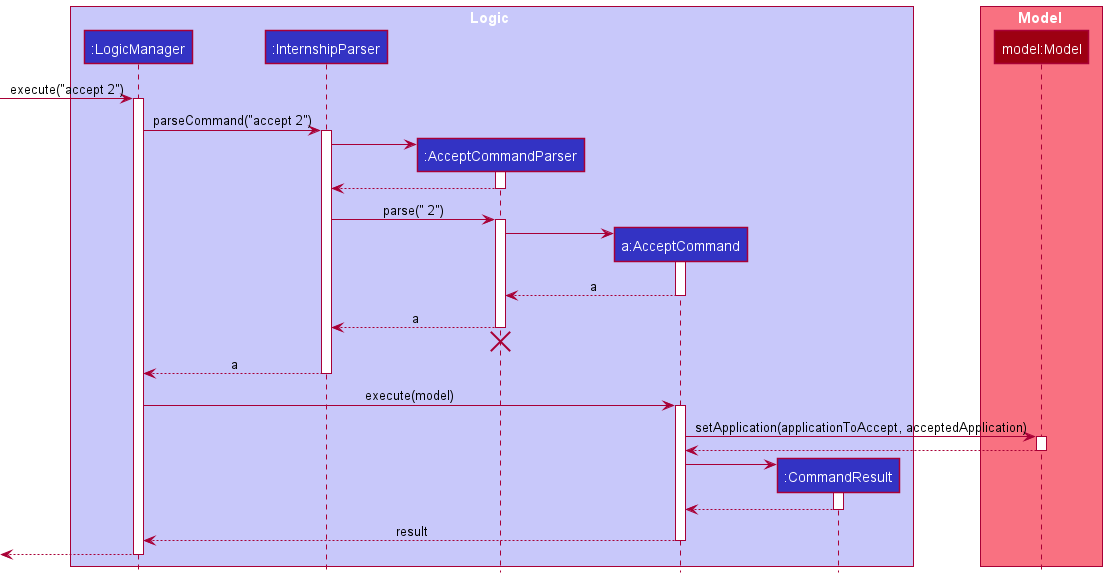
Step 1. The user enters the accept 2 command in the main window.
Step 2. The command is handled by the LogicManager#execute method, which then calls the InternshipParser#parseCommand method.
Step 3. InternshipParser matches the command word accept in the string and extracts the argument string 2.
Step 4. InternshipParser then calls the AcceptCommandParser#parse method. In this method, it is ensured that the input is of the correct format, and the argument string is converted to an Index instance.
Step 5. If the index specified by the user is valid then the AcceptCommandParser creates a new AcceptCommand instance and returns it to InternshipParser, which in turn returns it to LogicManager.
Step 6. LogicManager then calls the AcceptCommand#execute method.
Step 7. Next, AcceptCommand object calls the Model#setApplication method with the application to accept and accepted application
as arguments. It then returns a CommandResult object to the LogicManager.
Step 8. Finally, the CommandResult object is returned by the LogicManager.
Design considerations:
-
Alternative 1 (current choice): The default status when an application is added is
Pending. It can later be changed toAcceptedusing theacceptcommand.- Pros: Convenient for the user to use.
- Cons: User cannot add an application whose status is already known.
-
Alternative 2: Provide the ability to specify the status of an application at the time of adding.
- Pros: Easy to specify the desired status field while adding an application.
- Cons: The
addcommand will require too many parameters.
Reject feature
The reject command is modelled by the Status class which represents the
‘Status’ entity. The Status field is also added as a private attribute to the
Application class. This field can take the following values:
PendingAcceptedRejected
Note: When a new internship application is added, the value of the
Status field is ‘Pending’ by default.
The Reject command is facilitated by the RejectCommand class. It extends the Command class
and implements the RejectCommand#execute method which wraps the main
logic of the command. This command can be used to change the status of
the application from Pending to Rejected. When the status changes, the application completion
field would change from Uncompleted to Completed automatically.
The RejectCommandParser class is responsible for parsing the index received from the user. This
class implements the Parser interface. The RejectCommandParser#parse method of
this class parses the index and returns an RejectCommand object with the index
as the parameter.
Below is a sequence diagram and an explanation of how the RejectCommand is executed.
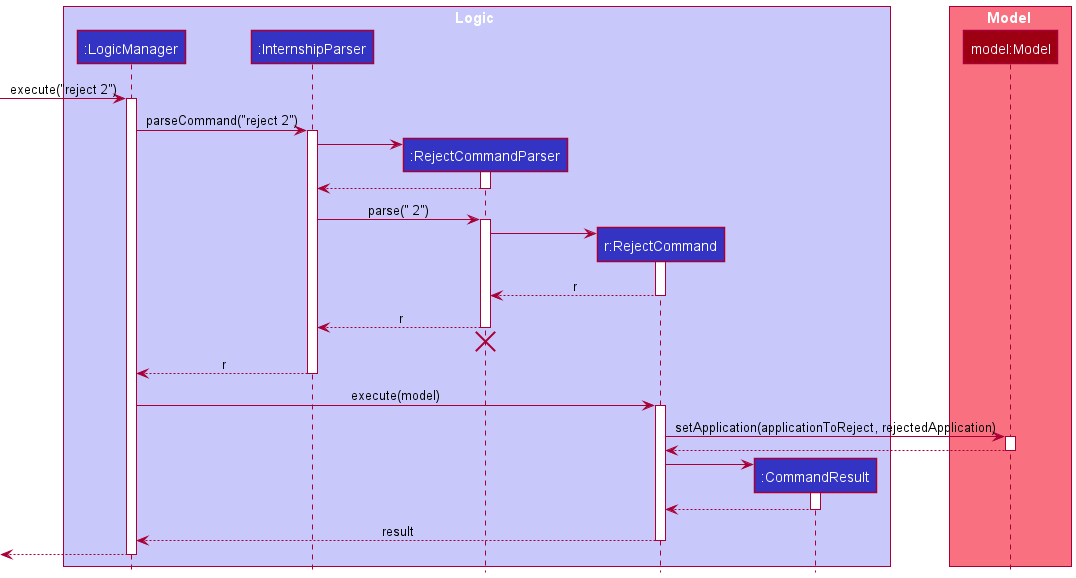
Step 1. The user enters the reject 2 command in the main window.
Step 2. The command is handled by the LogicManager#execute method, which then calls the InternshipParser#parseCommand method.
Step 3. InternshipParser matches the command word reject in the string and extracts the argument string 2.
Step 4. InternshipParser then calls the RejectCommandParser#parse method. In this method, it is ensured that the input is of the correct format, and the argument string is converted to an Index instance.
Step 5. If the index specified by the user is valid then the RejectCommandParser creates a new RejectCommand instance and returns it to InternshipParser, which in turn returns it to LogicManager.
Step 6. LogicManager then calls the RejectCommand#execute method.
Step 7. Next, RejectCommand object calls the Model#setApplication method with the application to reject and rejected application
as arguments. It then returns a CommandResult object to the LogicManager.
Step 8. Finally, the CommandResult object is returned by the LogicManager.
Design considerations:
-
Alternative 1 (current choice): The default status when an application is added is
Pending. It can later be changed toRejectedusing therejectcommand.- Pros: Convenient for the user to use.
- Cons: User cannot add an application whose status is already known.
-
Alternative 2: Provide the ability to specify the status of an application at the time of adding.
- Pros: Easy to specify the desired status field while adding an application.
- Cons: The
addcommand will require too many parameters.
Soon feature
The soon feature is implemented by the SoonCommandParser and SoonCommand classes.
SoonCommandParser class is responsible for parsing the parameter received from the user.
SoonCommand class is responsible for listing the applications whose submission or interview deadlines are within a certain number of days specified by the user.
Below is a sequence diagram and explanation of how the SoonCommand is executed.
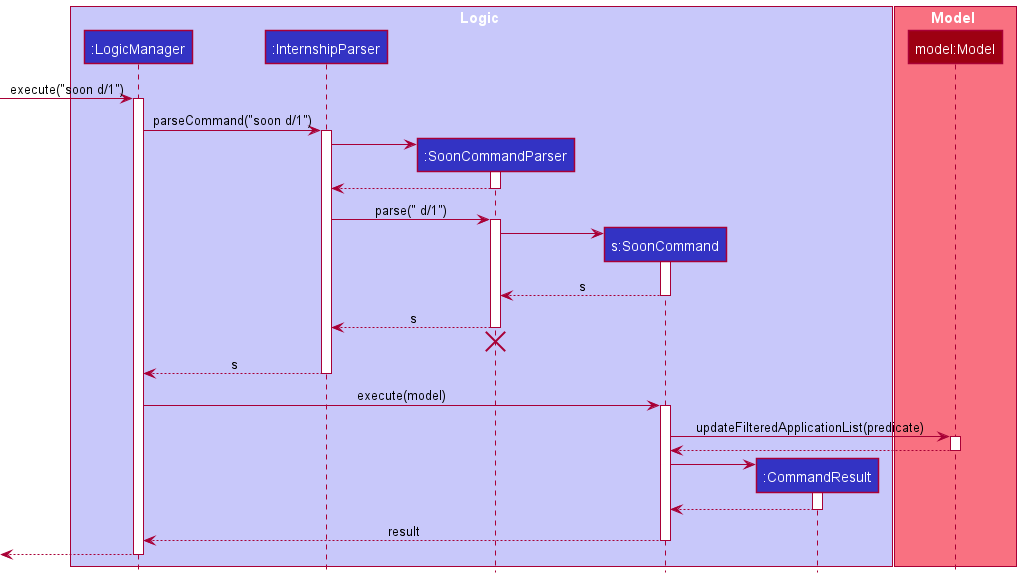
Step 1. The user enters soon d/1 command in the main window.
Step 2. The command is handled by LogicManager#execute method, which then calls the InternshipParser#parseCommand method.
Step 3. InternshipParser matches the command word soon in the string and extracts the argument string d/1.
Step 4. InternshipParser then calls SoonCommandParser#parse method and the argument string is converted to a Predicate and Index instances.
Step 5. SoonCommandParser creates a new SoonCommand instance and returns it to InternshipParser, which in turn returns it to LogicManager.
Step 6. Next, LogicManager calls SoonCommand#execute.
Step 7. SoonCommand calls the Model#updateFilteredApplicationList method to update the application panel.
Step 8. SoonCommand then creates a CommandResult instance and returns it to LogicManager.
Design considerations:
-
Alternative 1 (current choice): Lists applications using a specified field (e.g. user can specify deadline field with d/ or interview field with i/) and number of days.
- Pros: User can specify a number to see applications that are due within the specified number of days.
- Cons: The
sooncommand will require more parameters.
-
Alternative 2: List applications whose deadlines are within a pre-set number of days.
- Pros: Shorter command for user to input.
- Cons: Does not provide flexibility to the user.
Find feature
The find feature is implemented by the FindCommandParser and FindCommand classes.
FindCommandParser class is responsible for parsing the parameter received from the user.
FindCommand class is responsible for finding the matching applications with specified fields according to the given syntax and keyword.
Below is a sequence diagram and explanation of how the FindCommand is executed.
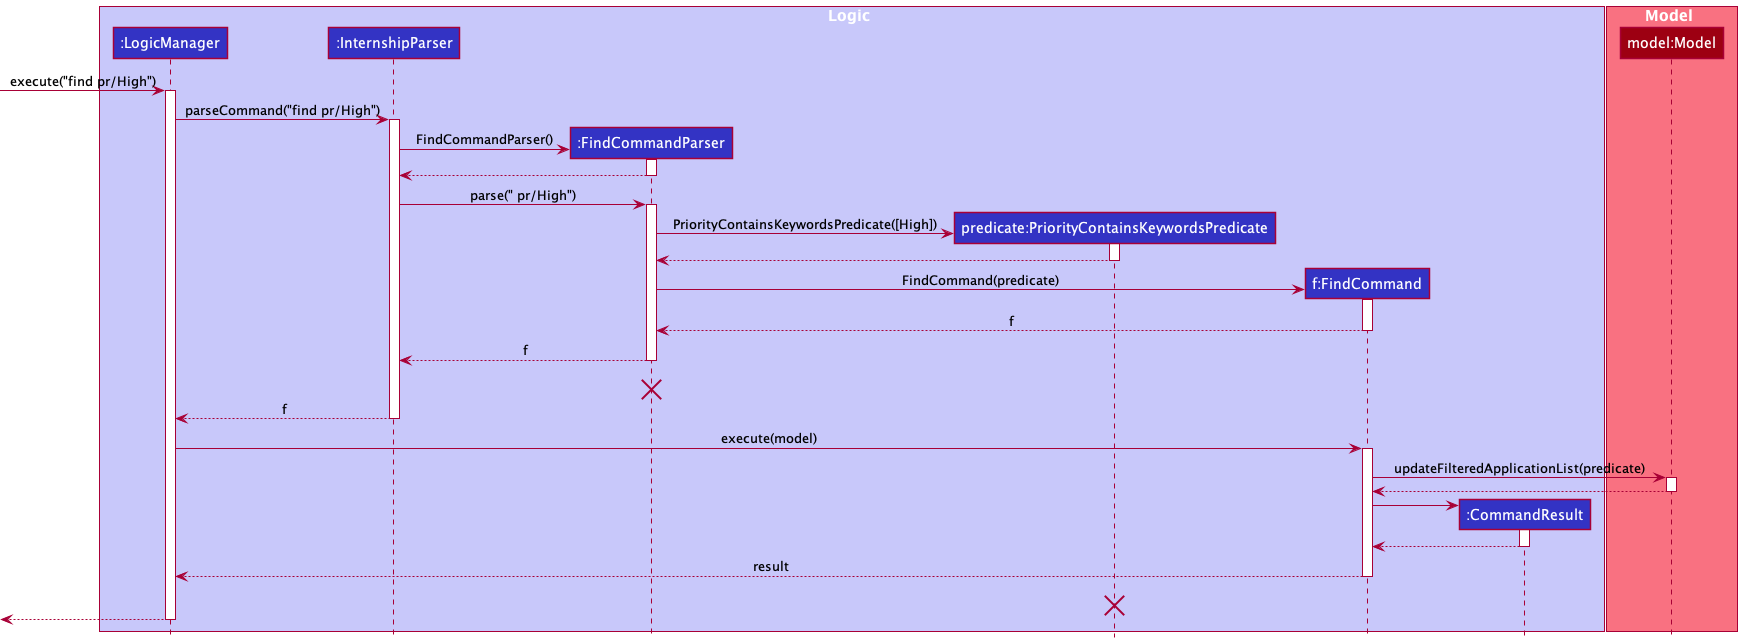
Step 1. The user enters find pr/High command in the main window.
Step 2. The command is handled by LogicManager#execute method, which then calls the InternshipParser#parseCommand method.
Step 3. The InternshipParser matches the command word find in the string and extracts the argument string pr/High.
Step 4. The InternshipParser then calls FindCommandParser#parse method and the argument string is converted to a List.
Step 5. The FindCommandParser creates a new PriorityContainsKeywordsPredicate instance with the priority List to handle the filter.
Step 6. The FindCommandParser creates a new FindCommand instance with the PriorityContainsKeywordsPredicate instance and returns it to InternshipParser, which in turn returns it to LogicManager.
Step 7. The LogicManager calls the FindCommand#execute method.
Step 8. The FindCommand calls the Model#updateFilteredApplicationList method and filters applications by priority High.
Step 9. The application lists the filtered applications that match the given field and keyword.
Step 10. FindCommand then creates a CommandResult and returns it to LogicManager.
Design considerations:
-
Alternative 1 (current choice): Matches applications using specified fields (e.g. user can specify deadline field with d/) and keywords.
- Pros: User can specify fields to match similar to the way in
AddCommandandEditCommand. - Cons: The
findcommand will require more parameters.
- Pros: User can specify fields to match similar to the way in
-
Alternative 2: Uses different command word for finding different fields (e.g. findD for matching application with deadlines).
- Pros: Shorter command for user to input.
- Cons: Harder for user to remember the command word as this format is not used in other methods.
Sort feature
The sort command is facilitated by the SortCommand class. It extends the Command class and implements the SortCommand#execute method which wraps the main logic of the command. This command can be used to sort the currently displayed list of applications according to the specified field.
The SortCommandParser class is responsible for parsing the field received from the user. This class implements the Parser interface. The SortCommandParser#parse method of this class parses the field and returns a SortCommand object with the field as the parameter.
Below is a sequence diagram and explanation of how the SortCommand is executed.
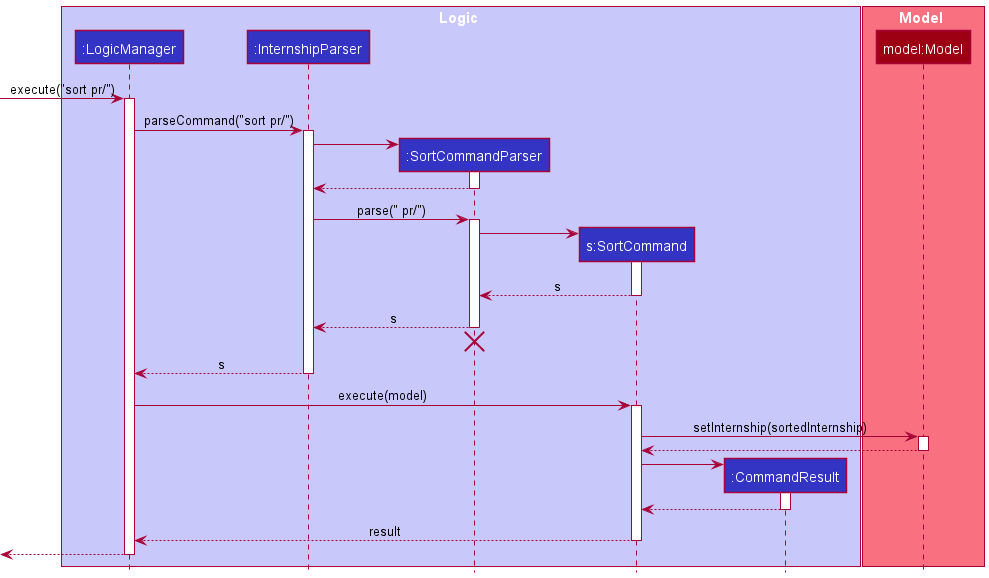
Step 1. The user enters sort pr/ command in the main window.
Step 2. The command is handled by LogicManager#execute method, which then calls the InternshipParser#parseCommand method.
Step 3. InternshipParser matches the command word sort in the string and extracts the argument string pr/.
Step 4. InternshipParser then calls SortCommandParser#parse method and the argument string is converted to a Parameter instance.
Step 5. SortCommandParser creates a new SortCommand instance and returns it to InternshipParser, which in turn returns it to LogicManager.
Step 6. Next, LogicManager calls the SortCommand#execute.
Step 7. SortCommand calls the Model#setInternship method to sort the application list by priority.
Step 8. The application shows the sorted list.
Step 9. SortCommand then creates a CommandResult and returns it to Logic Manager.
Design considerations:
-
Alternative 1 (current choice): Only allow lists to be sorted in one direction per field (e.g. sooner to later for deadline, alphabetically for company name)
- Pros: Easier to implement. The implemented direction of sorting is also the more logical one (users are unlikely to want to view their applications from lower to higher priority).
- Cons: The user cannot specify the direction of sorting (e.g. later deadlines first).
-
Alternative 2: Provide the option to specify the field to sort the list by as well as the direction of sorting.
- Pros: Users have more options on how to view their list of applications.
- Cons: The
sortcommand will require more parameters.
Undo/Redo feature
The undo/redo mechanism is facilitated by VersionedInternship. It extends Internship with an undo/redo history, stored internally as an internshipStateList and currentStatePointer. Additionally, it implements the following operations:
-
VersionedInternship#commit— Saves the current internship state in its history. -
VersionedInternship#undo— Restores the previous internship state from its history. -
VersionedInternship#redo— Restores a previously undone internship state from its history.
These operations are exposed in the Model interface as Model#commitInternship, Model#undoInternship and Model#redoInternship respectively.
Given below is an example usage scenario and how the undo/redo mechanism behaves at each step.
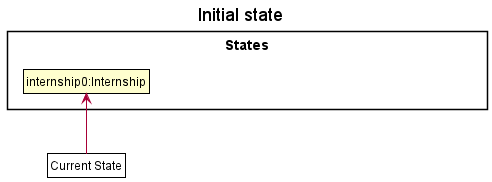
Step 1. The user launches the application for the first time. The VersionedInternship will be initialized with the initial Internship state, and the currentStatePointer pointing to that single Internship state.
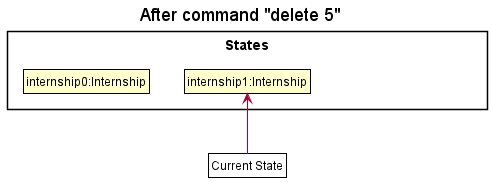
Step 2. The user executes delete 5 command to delete the 5th application in the Internship. The delete command calls Model#commitInternship, causing the modified state of the Internship after the delete 5 command executes to be saved in the internshipStateList, and the currentStatePointer is shifted to the newly inserted Internship state.
Step 3. The user executes add c/Amazon … to add a new application. The add command also calls Model#commitInternship, causing another modified Internship state to be saved into the internshipStateList.
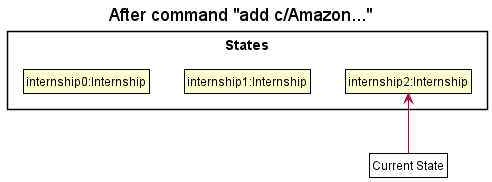
Model#commitInternship, so the Internship state will not be saved into the internshipStateList.
Step 4. The user now decides that adding the application was a mistake, and decides to undo that action by executing the undo command. The undo command will call Model#undoInternship, which will shift the currentStatePointer once to the left, pointing it to the previous Internship state, and restores the Internship to that state.
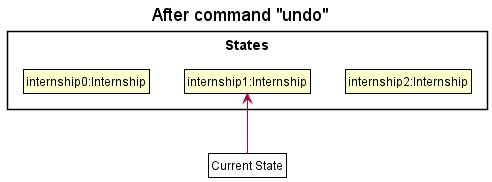
currentStatePointer is at index 0, pointing to the initial Internship state, then there are no previous Internship states to restore. The undo command uses Model#canUndoInternship to check if this is the case. If so, it will return an error to the user rather
than attempting to perform the undo.
The following sequence diagram shows how the undo operation works:
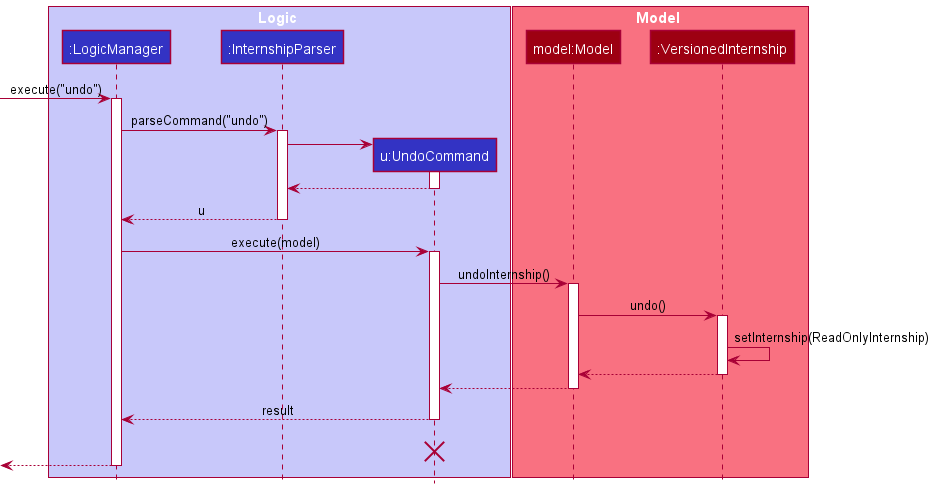
UndoCommand should end at the destroy marker (X) but due to a limitation of PlantUML, the lifeline reaches the end of diagram.
The redo command does the opposite — it calls Model#redoInternship, which shifts the currentStatePointer once to the right, pointing to the previously undone state, and restores the Internship to that state.
currentStatePointer is at index internshipStateList.size() - 1, pointing to the latest Internship state, then there are no undone Internship states to restore. The redo command uses Model#canRedoInternship() to check if this is the case. If so, it will return an error to the user rather than attempting to perform the redo.
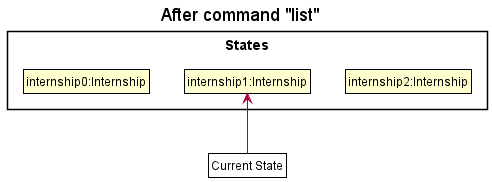
Step 5. The user then decides to execute the command list. Commands that do not modify the Internship, such as list, help, find, will usually not call Model#commitInternship, Model#undoInternship or Model#redoInternship. Thus, the internshipStateList remains unchanged.
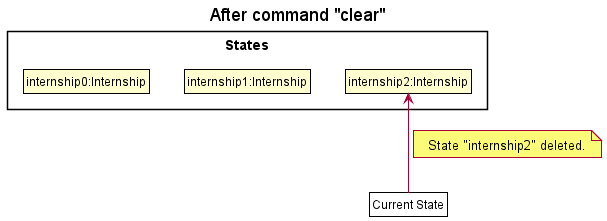
Step 6. The user executes clear, which calls Model#commitInternship. Since the currentStatePointer is not pointing at the end of the internshipStateList, all Internship states after the currentStatePointer will be purged. Reason: It no longer makes sense to redo the add c/Amazon command. This is the behavior that most modern desktop applications follow.
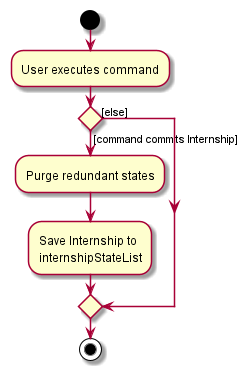
The following activity diagram summarizes what happens when a user executes a new command:
Design considerations:
Aspect: How undo & redo executes:
-
Alternative 1 (current choice): Saves the entire Internship.
- Pros: Easy to implement.
- Cons: May have performance issues in terms of memory usage.
-
Alternative 2: Individual command knows how to undo/redo by
itself.
- Pros: Will use less memory (e.g. for
delete, just save the application being deleted). - Cons: Must ensure that the implementation of each individual command are correct.
- Pros: Will use less memory (e.g. for
Documentation, logging, testing, configuration, dev-ops
Appendix 1: Requirements
Product scope
Target user profile:
Our target user is a university student who:
- has a need to manage a significant number of internship applications
- prefers desktop apps over other types
- can type fast
- prefers typing to mouse interactions
- is reasonably comfortable using CLI apps
Value proposition:
- Store all the information related to an internship application in one app.
- View applications in different ways (e.g. view applications with nearby application deadlines, find uncompleted applications only, sort by priority) to facilitate organised management of internship applications and avoid missing any deadlines.
- Manage internship applications faster than a typical mouse/GUI driven app.
User stories
Priorities: High (must have) - * * *, Medium (nice to have) - * *, Low (unlikely to have) - *
| Priority | As a … | I want to … | So that I can… |
|---|---|---|---|
* * * |
student | add a company I have applied | keep track of the lists of companies I have applied |
* * * |
student | record the deadline of an application | better organize my time for preparation and complete the requirements in time |
* * * |
student | record the position I have applied for an application | remember my responsibility for each application |
* * * |
student | record the requirements for an application | better understand what I need to prepare in order to succeed during the application |
* * * |
student | record the interview date and time for an application | avoid scheduling clashes for future interviews and better organize my time for the interview preparation |
* * * |
student | assign priority level to an application | know clearly which applications I should prioritize and get started first |
* * * |
student | view a list of all companies I have applied and the related details for each application | have a better picture about all the companies I have applied |
* * * |
student | delete one of the applications in the application list | stop tracking an application that I have withdrawn from |
* * * |
student | clear the application list in the app | get rid of all sample data when I first start using the app, or start over with a brand new empty list |
* * * |
student | edit the details of existing applications (e.g. company name/ applied position/ application deadline/ requirement details/ interview date and time, etc.) | rectify any mistakes I made initially, or update my entry to reflect new updates in my application |
* * * |
student | set an application as completed once I have submitted all the requirements | shift my attention to the other uncompleted applications |
* * * |
student | update the application outcome of an existing application (i.e., pending to accepted/ rejected) | update my entries to reflect the latest decision that I have received from the company, and make an informed choice as to which company to choose |
* * * |
student | sort the applications based on different criteria (e.g., closeness to deadline, level of priority, etc.) | view the application list displayed in different forms and prioritize the applications that appear at the top of the list |
* * * |
student | find the applications based on different criteria (e.g., company name contains a specified word, requirements involve a specific item, etc.) | highlight the applications of my current interest and temporarily filtering out other unrelated ones |
* * |
student | undo a change I have accidentally made to the application list | restore the information that has been unintentionally rectified and not losing any important information |
* * |
student | redo a change I have just undone | retrieve the changes I have made previously and not having to manually redo it |
Use cases
For all use cases below, the System is InternSHIP and the Actor is the user, unless specified otherwise.
(Similar use cases are grouped together as per the User Guide)
Tracking application details
Use case 1: Add an application entry
MSS
- User requests to add a new internship application entry to track. User inputs the company name, role applied for and application deadline.
-
Internship adds the entry to its list of entries, displays the success message, and shows the full application list.
Use case ends.
Extensions
-
1a. The user forgets to specify the company name, internship position or application deadline.
-
1a1. InternSHIP shows an error message.
Use case resumes at step 1.
-
-
1b. The input argument by the user is invalid.
-
1b1. InternSHIP shows an error message.
Use case resumes at step 1.
-
-
2a. User decides to undo the add action.
-
2a1. InternSHIP undoes the add action and restores the previous state.
Use case ends.
-
Use case 2: Update an application entry/Complete an application/Update the application outcome
MSS
- User requests to list all entries.
- InternSHIP shows a list of application entries.
- User requests to update the details of a specific entry in the list/mark the application as completed/ update the application outcome from pending to accepted or rejected.
-
InternSHIP updates the entry accordingly, displays the success message, and shows the full application list.
Use case ends.
Extensions
-
1a. The list is empty. There is nothing to update.
Use case ends.
-
3a. The user fails to enter the correct format or valid argument.
-
3a1. InternSHIP shows an error message.
Use case resumes at step 2.
-
-
3b. The application specified by the user already contains all the information user want to edit.
-
3b1. InternSHIP shows a warning message.
Use case ends.
-
-
4a. User decides to undo the update/complete action.
-
4a1. InternSHIP undoes the update/complete action and restores the previous state.
Use case ends.
-
Viewing specific applications
Use case 3: List applications with upcoming deadlines/interviews
MSS
- User requests to list applications with upcoming deadlines/ interviews.
-
InternSHIP shows a list of application entries whose deadlines/ interviews are upcoming, and the success message.
Use case ends.
Extensions
-
1a. The list is empty. There is nothing to list.
Use case ends.
-
1b. The user fails to enter the correct format.
-
1b1. InternSHIP shows an error message.
Use case resumes at step 1.
-
Use case 4: Find an application entry by fields
MSS
- User requests to find internship application(s) by inputting a specific field and keyword(s).
-
Internship displays a list of applications whose field matches the given keyword(s), and the success message.
Use case ends.
Extensions
-
1a. The list is empty. There is nothing to find.
Use case ends.
-
1b. The user fails to enter the correct format or valid argument.
-
1b1. InternSHIP shows an error message.
Use case resumes at step 1.
-
-
2a. The filtered list is empty.
Use case ends.
Use case 5: List all applications
MSS
- User requests to list all internship applications.
-
InternSHIP displays the full list of application entries, and the success message.
Use case ends.
Extensions
-
1a. The list is empty. There is nothing to list.
Use case ends.
Use case 6: Sort applications by a specific field
MSS
- User requests to sort the application list by a field.
-
InternSHIP shows the application list, sorted by the specified field, and displays a success message.
Use case ends.
Extensions
-
1a. The list is empty. There is nothing to sort.
Use case ends.
-
1b. The user fails to enter the correct format for the command or inputs an unsupported field to sort by.
-
1b1. InternSHIP shows an error message.
Use case resumes at step 1.
-
Others
Use case 7: Delete an application entry
MSS
- User requests to list all entries.
- InternSHIP shows a list of application entries.
- User requests to delete an application entry at a specific index.
-
InternSHIP removes the application entry at the specified index, displays a success message, and shows the application list with that application being removed.
Use case ends.
Extensions
-
1a. The list is empty. There is nothing to delete.
Use case ends.
-
1b. The user fails to enter the correct format or valid argument.
-
1b1. InternSHIP shows an error message.
Use case resumes at step 1.
-
-
2a. User decides to undo the delete action.
-
2a1. InternSHIP undoes the delete action and restores the previous state.
Use case ends.
-
Use case 8: Clear all application entries
MSS
- User requests to clear all application entries in InternSHIP.
-
InternSHIP wipes away all data in user’s application list, displays a success message, and shows an empty list.
Use case ends.
Extensions
-
2a. User decides to undo the clear action.
-
2a1. InternSHIP undoes the clear action and restores the previous state.
Use case ends.
-
Use case 9: Undo/Redo a change to the application list
MSS
- User requests to undo/redo a change that was just made.
-
InternSHIP undoes/redoes the most recent change, displays the success message, and shows the full application list.
Use case ends.
Extensions
-
1a. There is no previous change to be undone/redone.
-
1a1. InternSHIP displays an error message.
Use case ends.
-
Use case 10: Exit the program
MSS
- User requests to exit the program.
-
InternSHIP exits.
Use case ends.
Use case 11: View help
MSS
- User requests to view help.
-
InternSHIP displays a pop-up, which contains the link to the User Guide.
Use case ends.
Non-Functional Requirements
- InternSHIP should work on any mainstream OS as long as it has Java
11or above installed. - InternSHIP should be able to hold up to 1000 internship applications without a noticeable sluggishness in performance for typical usage.
- Any user command in InternSHIP should be executed within 1 second.
- A user with above average typing speed for regular English text (i.e. not code, not system admin commands) should be able to accomplish most of the tasks faster using commands than using the mouse.
- Any user within the target user profile should be able to use InternSHIP with the help of our User Guide.
Glossary
- Mainstream OS: Windows, Linux, Unix, macOS
- MSS : Main Success Scenario
Appendix 2: Instructions for manual testing
Given below are instructions to test the app manually.
Launch and shutdown
-
Initial launch
-
Download the jar file and copy into an empty folder.
-
Double-click the jar file.
Expected: Shows the GUI with a set of sample applications. The window size may not be optimum.
-
-
Saving window preferences
-
Move the window to a different location. Close the window.
-
Re-launch the app by double-clicking the jar file.
Expected: The most recent window size and location is retained.
-
Adding an application
- Test case:
add c/Grab p/software engineer d/2021-12-21- Expected output: An application entry is added to the InternSHIP application list, with company name
Grab, positionsoftware engineer, deadline2021-12-21(as specified by the user), and completionUncompleted, statusPending, priorityMedium(by default), and an empty list for bothRequirementandInterviewDateAndTime. A success message is shown in theResult Box, showing the details of the added application. The entire application list is displayed.
- Expected output: An application entry is added to the InternSHIP application list, with company name
- Test case:
add c/Grab p/software engineer d/2021-12-21 r/cv r/resume- Expected output: An application entry is added to the InternSHIP application list, with company name
Grab, positionsoftware engineer, deadline2021-12-21, requirementcvandresume(as specified by the user), and completionUncompleted, statusPending, priorityMedium(by default), and an empty list forInterviewDateAndTime. A success message is shown in theResult Box, showing the details of the added application. The entire application list is displayed.
- Expected output: An application entry is added to the InternSHIP application list, with company name
- Test case:
add c/Grab p/software engineer- Expected output: An error message is shown in the
Result Box, as the compulsory fieldDeadlineis not specified upon adding.
- Expected output: An error message is shown in the
- Test case:
add c/Grab p/software engineer d/2021-12-21 r/aaaaaaaaaaaaaaaaaaaaaaaaaaaaaaaaaaaaaa- Expected output: An error message is shown in the
Result Box, as theRequirementfield is not allowed to contain more than 20 characters.
- Expected output: An error message is shown in the
Editing an application
Prerequisites: The currently displayed application list is not empty.
Assumptions:
- There are three applications in the full application list, which are all displayed at first.
- The application at index
1has company nameAmazon. - The application at index
2has requirementcvandresume. - The application at index
3has positiontester.
- Test case:
edit 1 c/Bytedance- Expected output: The company name of the application at index
1is changed toBytedance. A success message is shown in theResult Box, showing the details of the edited application. The entire application list is displayed.
- Expected output: The company name of the application at index
- Test case:
edit 2 r/- Expected output: All requirements of the application at index
2are removed. A success message is shown in theResult Box, showing the details of the edited application. The entire application list is displayed.
- Expected output: All requirements of the application at index
- Test case:
edit 10 c/Grab- Expected output: An error message is shown in the
Result Box, as the index specified exceeds the length of the displayed application list.
- Expected output: An error message is shown in the
- Test case:
edit 3 p/tester- Expected output: A warning message is shown in the
Result Box, as the field after editing is exactly the same as before.
- Expected output: A warning message is shown in the
Completing an application
Prerequisites: The currently displayed application list is not empty. Assumptions:
- There are three applications in the full application list, which are all displayed at first.
- The application at index
1isUncompleted. - The application at index
2isCompleted.
- Test case:
complete 1- Expected output: The
Completionof the application at index1is changed toCompleted. A success message is shown in theResult Box, showing the details of the completed application. The entire application list is displayed.
- Expected output: The
- Test case:
complete 2- Expected output: A warning message is shown in the
Result Box, as the application is already marked asCompleted.
- Expected output: A warning message is shown in the
- Test case:
complete 10- Expected output: An error message is shown in the
Result Box, as the index specified exceeds the length of the displayed application list.
- Expected output: An error message is shown in the
Accepting/Rejecting an application
Prerequisites: The currently displayed application list is not empty. Assumptions:
- There are three applications in the full application list, which are all displayed at first.
- The status of the application at index
1isPending. - The status of the application at index
2isAccepted. - The status of the application at index
3isRejected.
- Test case:
accept 1- Expected output: The
Statusof the application at index1is changed toAccepted. A success message is shown in theResult Box, showing the details of the accepted application. The entire application list is displayed.
- Expected output: The
- Test case:
reject 2- Expected output: The
Statusof the application at index1is changed toRejected. A success message is shown in theResult Box, showing the details of the rejected application. The entire application list is displayed.
- Expected output: The
-
Test case:
reject 3Expected output: A warning message is shown in theResult Box, as the application at index3is already marked asRejected. - Test case:
accept 10- Expected output: An error message is shown in the
Result Box, as the index specified exceeds the length of the displayed application list.
- Expected output: An error message is shown in the
Finding an application
Prerequisites: The currently displayed application list is not empty. Assumptions:
- There are three applications in the full application list, which are all displayed at first.
- The company name of the application at index
1,2,3areBytedance,Amazon, andAmazon Singaporerespectively. - The position of the application at index
1,2,3arefrontend developer,backend developer, andtesterrespectively.
- Test case:
find p/developer- Expected output: The application list updates to only displaying the first two applications of the original list. A success message is shown in the
Result Box, describing that the currently displayed list is a result of filtering by position.
- Expected output: The application list updates to only displaying the first two applications of the original list. A success message is shown in the
- Test case:
find p/engineer- Expected output: A message is shown in the
Result Boxwhich indicates that there is no matching result. An empty application list is displayed.
- Expected output: A message is shown in the
- Test case:
find c/Amazon- Expected output: The application list updates to only displaying the last two applications of the original list. A success message is shown in the
Result Box, describing that the currently displayed list is a result of filtering by company name.
- Expected output: The application list updates to only displaying the last two applications of the original list. A success message is shown in the
- Test case:
find d/2021-12-21- Expected output: An error message is shown in the
Result Box, as InternSHIP currently doesn’t support finding applications byDeadline.
- Expected output: An error message is shown in the
Listing all applications that are close to submission deadline or interview time
Prerequisites: The currently displayed application list is not empty. Assumptions:
- There are three applications in the full application list, which are all displayed at first.
- The interview time of the application at index
1,2,3are2021-11-10 1200,2021-11-11 1200, and2021-11-12 1200respectively. - The deadline of the application at index
1,2,3are2021-11-10,2021-11-11, and2021-11-12respectively. - The current date and time when user enters the command is
2021-11-09 1200
- Test case:
soon d/2- Expected output: The application list updates to only displaying the last two applications of the original list. A success message is shown in the
Result Box, describing that the currently displayed list is showing all applications that are within 2 days of deadline.
- Expected output: The application list updates to only displaying the last two applications of the original list. A success message is shown in the
- Test case:
soon i/1- Expected output: The application list updates to only displaying the first application of the original list. A success message is shown in the
Result Box, describing that the currently displayed list is showing all applications that are within 1 day of interview time.
- Expected output: The application list updates to only displaying the first application of the original list. A success message is shown in the
- Test case:
soon d/0- Expected output: A message is shown in the
Result Boxwhich indicates that there is no application that is due in the specified deadline. An empty application list is displayed.
- Expected output: A message is shown in the
- Test case:
soon d/- Expected output: An error is shown in the
Result Box, as the day is not specified.
- Expected output: An error is shown in the
Listing all applications
- Test case:
list- Assumption: The application list is not empty.
- Expected output: A success message is shown in the
Result Box. The entire application list is displayed.
- Test case:
list- Assumption: The application list is empty.
- Expected output: An error message is shown in the
Result Box, as there is no application to be displayed.
Sorting the applications
Prerequisites: The currently displayed application list is not empty. Assumptions:
- There are three applications in the full application list, which are all displayed at first.
- The company name of the application at index
1,2,3areBytedance,Amazon, andGrabrespectively. - The interview time of all three applications are not specified.
- Test case:
sort c/- Expected output: The applications at index
1and2switches their order. A success message is shown in theResult Box, indicating that the currently displayed list is sorted by company name in alphabetical order.
- Expected output: The applications at index
- Test case:
sort i/- Expected output: An error message is shown in the
Result Box, as there is no interview time specified for any of the applications.
- Expected output: An error message is shown in the
- Test case:
sort- Expected output: An error message is shown in the
Result Box, as the sorting criterion is not specified.
- Expected output: An error message is shown in the
Deleting an application
Prerequisites: The currently displayed application list is not empty. Assumptions:
- There are three applications in the full application list, which are all displayed at first.
- Test case:
delete 1- Expected output: The application at index
1is removed from the application list. A success message is shown in theResult Box, showing the details of the deleted application.
- Expected output: The application at index
- Test case:
delete 10- Expected output: An error message is shown in the
Result Box, as the index specified exceeds the length of the currently displayed list.
- Expected output: An error message is shown in the
- Test case:
delete- Expected output: An error message is shown in the
Result Box, as the index of the application to be deleted is not specified.
- Expected output: An error message is shown in the
Clearing all applications
- Test case:
clear- Expected output: All applications in the InternSHIP application list are cleared. A success message is shown in the
Result Box. An empty application list is shown.
- Expected output: All applications in the InternSHIP application list are cleared. A success message is shown in the
Undoing/redoing a change
Assumptions:
- InternSHIP is just launched and the user has not typed in any command yet.
- There are three applications in the full application list, which are all displayed at first.
- Test case:
delete 1followed byundo- Expected output: After
delete 1, the application atindex 1is deleted; afterundo, it is retrieved back and reappear in the application list, so there is no change to the application list. A success message is shown in theResult Box, indicating the success of the undo action.
- Expected output: After
- Test case:
delete 1followed byundofollowed byredo- Expected output: After
delete 1, the application atindex 1is deleted; afterundo, it is retrieved back and reappear in the application list; afterredo, the previous deletion is redone, so eventually there are two applications in the application list (as the first application is already deleted). A success message is shown in theResult Box, indicating the success of the redo action.
- Expected output: After
- Test case:
delete 1followed byclearfollowed byundo- Expected output: After
delete 1, the application at index1is deleted; afterclear, all applications are cleared and the application list is empty; afterundo, theclearcommand (i.e., the most recent change) is undone, so eventually there are two applications in the application list (as the first application is already deleted). A success message is shown in theResult Box, indicating the success of the undo action.
- Expected output: After
- Test case:
undo- Expected output: An error message is shown in the
Result Box, as the app is just launched and there is no change to be undone.
- Expected output: An error message is shown in the
- Test case:
redo- Expected output: An error message is shown in the
Result Box, as the app is just launched and there is no change to be redone.
- Expected output: An error message is shown in the
Exiting the app
- Test case:
exit
- Expected output: The app shuts down.
Viewing help
- Test case:
help
- Expected output: The
HelpWindow pops up, showing a link to theUser Guide.
- Expected output: The
Saving data
-
Dealing with missing/corrupted data files
-
Test case: simulate missing data file How: Delete
internship.jsonfrom./data/internship.json. LaunchInternSHIP.jar. Expected: The GUI should pop up, with the default sample entries in the application list. A newinternship.jsonfile containing the 4 sample entries will be created. -
Test case: simulate corrupted data file How: Open
internship.jsonin a text editor (e.g. IntelliJ), delete the first character{from the file and save the changes. LaunchInternSHIP.jar. Expected: The GUI should pop up, but with no entries in the application list. If terminal is used to open the jar file, warnings about incorrect data file format should be seen in the console output. A new emptyinternship.jsonfile will be created.
-
Appendix 3: Effort
If the effort required to create AB3 is 10, we would place the effort level required to implement the current version of InternSHIP at 15.
Our team has put in a significant amount of effort to get InternSHIP to the current version. Below, we list some notable changes overall and notable features implemented by us.
Notable changes in general
-
Morphed existing AB3 to align with our design for InternSHIP
We have put in a significant amount of effort morphing the existing code base, AB3 to support the need of our application, which is about internship data management.
Firstly, we had to create new classes for fields related to an internship application, such as
Company,Position,Deadline,Requirements,InterviewDateAndTime,Priority,CompletionandStatus. Each of these classes have different input format requirements and are related to different commands.Secondly, we had to remove all the irrelevant classes and update the existing test cases to fit our need.
Lastly, we had to integrate all these new classes with the existing code to save applications to a data file in InternSHIP. This required major refactoring of existing classes to support multiple new fields and commands.
-
Redesigned GUI
Compared to AB3, InternSHIP displays each field of an internship application under a separate column. The entire internship list is displayed in a vertical list where each adjacent entry is highlighted with a different shade of blue.
In addition, the project icon and overall GUI colour scheme were carefully chosen and designed to represent our value proposition. InternSHIP will help its users navigate through the sea of internship applications for their voyage to their desired company.
Notable Features
Notable features we implemented from scratch include Complete, Accept, Reject, Sort, Find, Soon and Undo/Redo. We came up with these features as they fit well in helping our target users solve problems they may encounter in their internship data management.
The implementation details and design considerations for these features can be found in the Implementation section.
Appendix 4: Limitations and Future improvements
We acknowledge the fact that our current product is not perfect, and it still has room for improvement. Below are some limitations and future improvements of our product.
Limitations
-
Commands not accepting multiple fields
Currently, our product does not support the functionality of accepting multiple fields. For example:
find c/DBS p/programmersoon d/7 i/20-
sort c/ d/
The above commands will produce an error message, stating that the commands are invalid. This is because our initial implementation would only take one field (e.g c/) and ignore the rest. Thus, the workaround for this issue is to not allow the users to enter multiple fields.
-
Invalid prefix resulting in an unexpected error message
As pointed out in PE-D, our current product is not able to check for a typo in the prefixes. For example:
-
edit 1 c/Grab zp/Engineer
The example above will produce an error message, stating that the company name should contain only alphanumeric characters. This is because our current implementation takeszp/Engineeras a part of the company name.
-
Future Improvements
-
Commands not accepting multiple fields
This limitation could be improved by accepting both fields and showing the application(s) that satisfy both criteria. For example,
find c/DBS p/programmershould show application(s) whose company name is “DBS” and position is “programmer”. -
Invalid prefix resulting in an unexpected error message
This limitation could be improved by checking if the fields entered by the users match any of the valid prefixes. Perhaps, for every
/found, the preceding character(s) could be checked against all the valid prefixes.